18 Jan 2023

Hello everyone, In my previous article, I said that “I want to start new article series about Gradle”. And this article will be the second article of that series. In this article, I’ll explain the new feature a.k.a version catalog which is developed by Gradle and providing to declare a conventional file.
Firstly, let’s start with what is TOML?
What is TOML?

According to its website, TOML aims to be a minimal configuration file format that’s easy to read due to obvious semantics. TOML is designed to map unambiguously to a hash table. TOML should be easy to parse into data structures in a wide variety of languages.
So thanks to its feature which is mapped to a hash table make it is easier to match it with a Gradle script.
Also, you can see this link for more detail.
So what should we know while developing with TOML?
Things to should we know
The TOML file consists of 4 major sections
- version, this section is used to declare versions that can be referenced by dependencies
- libraries, this section is used to declare the aliases to coordinates
- bundles, this section is used to declare dependency bundles
- plugins, this section is used to declare plugins
So, what to consider before implementing this feature? Let’s see about it now.
Things to consider
- Make sure your gradle version is at least
7.4.2
- Make sure that adding
enableFeaturePreview("VERSION_CATALOGS") in settings.gradle
- Create a
libs.versions.toml file inside your gradle folder
If you have followed these points, we can move on to the step-by-step use of this feature.
Usage
1) First, open the libs.versions.toml and then add the version of each library we use.
[versions]
kotlin = "1.7.20"
mockito = "4.3.1"
gradlePlugins = "7.2.0" # it is mentioned that it should be at least 7.2.0
2) Then, it included these libraries which are declared version
[libraries]
kotlinBom = { module = "org.jetbrains.kotlin:kotlin-bom", version.ref = "kotlin" }
mockitoCore = { module = "org.mockito:mockito-core", version.ref = "mockito" }
mockitoInline = { module = "org.mockito:mockito-inline", version.ref = "mockito" }
mockitoJupiter = { module = "org.mockito:mockito-junit-jupiter", version.ref = "mockito" }
3) Now as you can see from the examples above, We have three libraries that we can bundle.
[bundles]
mockito = ["mockitoCore", "mockitoInline", "mockitoJupiter"]
4) It is declared the plugins that we use, under to plugins sections.
[plugins]
android = { id = "com.android.application", version.ref = "gradlePlugins-agp" }
kotlinAndroid = { id = "org.jetbrains.kotlin.android", version.ref = "kotlin" }
kapt = { id = "org.jetbrains.kotlin.kapt", version.ref = "kotlin" }
Let’s look at the final form of our libs.versions.toml file.
[versions]
kotlin = "1.7.20"
mockito = "4.3.1"
gradlePlugins = "7.2.0" # it is mentioned that it should be at least 7.2.0

[libraries]
kotlinBom = { module = "org.jetbrains.kotlin:kotlin-bom", version.ref = "kotlin" }
mockitoCore = { module = "org.mockito:mockito-core", version.ref = "mockito" }
mockitoInline = { module = "org.mockito:mockito-inline", version.ref = "mockito" }
mockitoJupiter = { module = "org.mockito:mockito-junit-jupiter", version.ref = "mockito" }

[bundles]
mockito = ["mockitoCore", "mockitoInline", "mockitoJupiter"]

[plugins]
android = { id = "com.android.application", version.ref = "gradlePlugins" }
kotlinAndroid = { id = "org.jetbrains.kotlin.android", version.ref = "kotlin" }
kapt = { id = "org.jetbrains.kotlin.kapt", version.ref = "kotlin" }
6) As you can see, we have declared libraries that we’ll use. So, let’s see how we’ll use them in Gradle files.
plugins {
    claspath(libs.plugins.android)
    claspath(libs.plugins.kotlinAndroid)
    claspath(libs.plugins.kapt)
}
implementation(libs.bundles.mockito)
Conclusion
In conclusion, we’ve talked about TOML language, how to use TOML with Gradle and how to create and use libs.versions.toml.
I hope this blog post has been helpful to you. See you in the next posts.

30 Nov 2022

Hi everyone,
After a long time, I want to start new article series about Gradle. In this article series, I will try to talk about Gradle tips, new Gradle technologies and Gradle optimizations. Before talking about these, let’s talk, about what is the matter of Gradle for the Android development world, how to use it, and why we need to use Gradle.
if you’re ready, let’s start!
What is Gradle?
Gradle is an open-source build automation tool focused on flexibility and performance. To use the Gradle build script, we write Groovy or Kotlin DSL.
Why we should use Gradle and What are the advantages?
To write a few reasons why we should use Gradle and a few advantages:
-
High performance, give high performance due to avoiding unnecessary work. Because only runs that what need to do work. And Gradle uses various caches to reuse outputs from previous builds.
-
JVM foundation, Gradle runs on the JVM. This is a bonus for users familiar with Java, since build logic can use the standard Java APIs.
-
Convention
-
Extensibility, most builds have special requirements that require custom build logic. For example, they add many new build concepts such as flavors and build types.
-
IDE support, Gradle is supported by different IDE. Like Android Studio, IntelliJ IDEA, Eclipse, VSCode, and NetBean.
-
Insight, with Build Scan, provides extensive information about a build that you can use to identify issues.
You can reach this if you want more details about Gradle.
So let’s see the basic usage of Gradle both groovy and Kotlin DSL in Android.
Basic Usage of Gradle on Android

The Android build system compiles app resources and source code and packages them into APKs or Android App Bundles that you can test, deploy, sign, and distribute.
At that point, Android studio is based on Gradle and uses it. Gradle provides several features that are specific to building Android apps.
As an advanced build toolkit, automate and manage the build process while letting you define flexible, custom build configurations. Each build configuration can define its own set of code and resources while reusing the parts common to all versions of your app. The Android Gradle plugin works with the build toolkit to provide processes and configurable settings that are specific to building and testing Android apps.
With Gradle, you can use and manage to build types, product flavors, build variants, manifest entries, add/remove dependencies, signing, code and resource shrinking and multiple APK support.
We’ll look at these regulations in more detail in the next articles. However, right now let’s review mainly Gradle files.
When an Android project is created once, this project there will be three different Gradle files and two different properties files. These Gradle files are settings.gradle, build.gradle (in the top-level), build.gradle, and these Gradle properties files are gradle.properties and local.properties
- settings.gradle, (nit: settings.gradle for groovy/ settings.gradle.kts for kotlin script) is located in the root project directory. With this settings file can define project-level repository settings and inform Gradle which should be included when building an app. Especially, this feature is important for multi-module applications.
Here let’s see how to use it.
pluginManagement {

    /**
     * The pluginManagement {repositories {...}} block configures the
     * repositories Gradle uses to search or download the Gradle plugins and
     * their transitive dependencies. Gradle pre-configures support for remote
     * repositories such as JCenter, Maven Central, and Ivy. You can also use
     * local repositories or define your own remote repositories. The code below
     * defines the Gradle Plugin Portal, Google's Maven repository,
     * and the Maven Central Repository as the repositories Gradle should use to look for its
     * dependencies.
     */

    repositories {
        gradlePluginPortal()
        google()
        mavenCentral()
    }
}
dependencyResolutionManagement {

    /**
     * The dependencyResolutionManagement {repositories {...}}
     * block is where you configure the repositories and dependencies used by
     * all modules in your project, such as libraries that you are using to
     * create your application. However, you should configure module-specific
     * dependencies in each module-level build.gradle file. For new projects,
     * Android Studio includes Google's Maven repository and the Maven Central
     * Repository by default, but it does not configure any dependencies (unless
     * you select a template that requires some).
     */

    repositoriesMode.set(RepositoriesMode.FAIL_ON_PROJECT_REPOS)
    repositories {
        google()
        mavenCentral()
    }
}

rootProject.name = "My application"
include(":app")
- build.gradle, (nit: build.gradle for groovy/ build.gradle.kts for kotlin script) is located in the root project directory. With this file, can define dependencies that apply to all modules of our project. Thus, this file is common for all modules.
Here let’s see how to use it.
plugins {

    /**
     * Use `apply false` in the top-level build.gradle file to add a Gradle
     * plugin as a build dependency but not apply it to the current (root)
     * project. Don't use `apply false` in sub-projects. For more information,
     * see Applying external plugins with same version to subprojects.
     */

    id("com.android.application") version "7.3.1" apply false
    id("com.android.library") version "7.3.1" apply false
    id("org.jetbrains.kotlin.android") version "1.7.20" apply false
}
- build.gradle, (nit: build.gradle for groovy/ build.gradle.kts for kotlin script) is located in application modules.
In this file, we can define the application id, compile SDK, default configs, build types, and dependencies for each module.
/**
 * The first section in the build configuration applies the Android Gradle plugin
 * to this build and makes the android block available to specify
 * Android-specific build options.
 */

plugins {
    id("com.android.application")
}

/**
 * The android block is where you configure all your Android-specific
 * build options.
 */

android {

    /**
     * The app's namespace. Used primarily to access app resources.
     */

    namespace = "com.example.myapp"

    /**
     * compileSdk specifies the Android API level Gradle should use to
     * compile your app. This means your app can use the API features included in
     * this API level and lower.
     */

    compileSdk = 33

    /**
     * The defaultConfig block encapsulates default settings and entries for all
     * build variants and can override some attributes in main/AndroidManifest.xml
     * dynamically from the build system. You can configure product flavors to override
     * these values for different versions of your app.
     */

    defaultConfig {

        // Uniquely identifies the package for publishing.
        applicationId = "com.example.myapp"

        // Defines the minimum API level required to run the app.
        minSdk = 21

        // Specifies the API level used to test the app.
        targetSdk = 33

        // Defines the version number of your app.
        versionCode = 1

        // Defines a user-friendly version name for your app.
        versionName = "1.0"
    }

    /**
     * The buildTypes block is where you can configure multiple build types.
     * By default, the build system defines two build types: debug and release. The
     * debug build type is not explicitly shown in the default build configuration,
     * but it includes debugging tools and is signed with the debug key. The release
     * build type applies ProGuard settings and is not signed by default.
     */

    buildTypes {

        /**
         * By default, Android Studio configures the release build type to enable code
         * shrinking, using minifyEnabled, and specifies the default ProGuard rules file.
         */

        getByName("release") {
            isMinifyEnabled = true // Enables code shrinking for the release build type.
            proguardFiles(
                getDefaultProguardFile("proguard-android.txt"),
                "proguard-rules.pro"
            )
        }
    }

    /**
     * The productFlavors block is where you can configure multiple product flavors.
     * This lets you create different versions of your app that can
     * override the defaultConfig block with their own settings. Product flavors
     * are optional, and the build system does not create them by default.
     *
     * This example creates a free and paid product flavor. Each product flavor
     * then specifies its own application ID, so that they can exist on the Google
     * Play Store, or an Android device, simultaneously.
     *
     * If you declare product flavors, you must also declare flavor dimensions
     * and assign each flavor to a flavor dimension.
     */

    flavorDimensions += "tier"
    productFlavors {
        create("free") {
            dimension = "tier"
            applicationId = "com.example.myapp.free"
        }

        create("paid") {
            dimension = "tier"
            applicationId = "com.example.myapp.paid"
        }
    }
}

/**
 * The dependencies block in the module-level build configuration file
 * specifies dependencies required to build only the module itself.
 * To learn more, go to Add build dependencies.
 */

dependencies {
    implementation(project(":lib"))
    implementation("androidx.appcompat:appcompat:1.5.1")
    implementation(fileTree(mapOf("dir" to "libs", "include" to listOf("*.jar"))))
}
So and now let’s look at Gradle properties files. First of all, Gradle properties, located in your root project directory, that you can use to specify settings for the Gradle build toolkit itself.
- gradle.properties, This is where you can configure project-wide Gradle settings, such as the Gradle daemon’s maximum heap size. Also, you can include these features, command-line flags (such as –build-cache. These have precedence over properties and environment variables), system properties (such as systemProp.http.proxyHost=somehost.org.), gradle properties (such as org.gradle.caching=true) and environment variables(such as GRADLE_OPTS sourced by the environment that executes Gradle). To reach more information that, can see this link.
- local.properties configures local environment properties for build system, including the following: ndk.dir (Path to the NDK. This property has been deprecated. Any downloaded versions of the NDK are installed in the ndk directory within the Android SDK directory.), sdk.dir(Path to the SDK), cmake.dir (Path to CMAKE), ndk.symlinkdir (In Android Studio 3.5 and higher, creates a symlink to the NDK that can be shorter than the installed NDK path.)
Conclusion
For this article, I tried to answer the questions, what is Gradle?, what are the advantages of Gradle? and how to use it on Android. So we’ll look at Gradle in more detail in the next posts. See you!

12 Dec 2020
Hello everyone,
In this article, I’ll talk about FragmentResult, which allow us communicate between fragments.
I’ll try to answer question like What is FragmentResult, In what situations should we use it, How to use.
Let’s start by explaining what is FragmentResult.
What is FragmentResult?
We’ve heard Android doesn’t support to target (setTargetFragment() / getTargetFragment()) recent updates.
Several solutions were offered as an alternative to these structures. One of them is FragmentResult structures.
In what situations should we use FragmentResult?
You’ll communicate between the two fragments, but you don’t want use viewmodel or arguments, so fragmentresult is for you.
Give you a more detailed example, you can also use situations like in the scenario I’ll do and use in a mini application.
Scenario: We’ve application that use the Navigation Component. In this application, we want to open a dialog in a trailer and change the trailer according to the result from the dialog.
Usage of FragmentResult
First of all, I mentioned that I’ll use navigation component in the application.
Graph structure I use;
<?xml version="1.0" encoding="utf-8"?>
<navigation xmlns:android="http://schemas.android.com/apk/res/android"
    xmlns:app="http://schemas.android.com/apk/res-auto"
    xmlns:tools="http://schemas.android.com/tools"
    android:id="@+id/nav_graph.xml"
    app:startDestination="@id/homeFragment">

    <fragment
        android:id="@+id/homeFragment"
        android:name="com.fevziomurtekin.myapplication.HomeFragment"
        android:label="fragment_home"
        tools:layout="@layout/fragment_home" />

    <dialog
        android:id="@+id/homeDialog"
        android:name="com.fevziomurtekin.myapplication.HomeDialog"
        android:label="HomeDialog" />
</navigation>
As you can see I setup very simple. It consists of just one fragment and dialog.
If we talk about HomeFragment;
class HomeFragment : Fragment() {

    private var tvResult: TextView? = null
    private var btnShowDialog: Button? = null

    override fun onCreateView(
        inflater: LayoutInflater,
        container: ViewGroup?,
        savedInstanceState: Bundle?
    ): View? = inflater.inflate(R.layout.fragment_home,container,false)


    override fun onViewCreated(view: View, savedInstanceState: Bundle?) {
        super.onViewCreated(view, savedInstanceState)

        tvResult = view.findViewById(R.id.tv_result)
        btnShowDialog = view.findViewById(R.id.btn_show_dialog)

        // this listen to result.
        parentFragmentManager.setFragmentResultListener(
            REQUEST_KEY,
            this,
            { key, data ->
                if(key == REQUEST_KEY){
                    val result = data.getBoolean("data").let { isAccept->
                        if(isAccept) "Accepted" else "Rejected"
                    }
                    tvResult?.text = result
                }
            }
        )

        // show bottom dialog
        btnShowDialog?.setOnClickListener {
            findNavController().navigate(R.id.homeDialog)
        }

    }
}
As you can see in the code above, I’m listening to result returned with setFragmentResultListener. The result comes to us as key and bundle data. We handle this too.
If we look at our DialogFragment where this is data is sent.
class HomeDialog : BottomSheetDialogFragment() {

    private var btnAccept: Button? = null
    private var btnReject: Button? = null

    override fun onStart() {
        super.onStart()
        (requireView().parent as? View)?.let { safeView ->
            BottomSheetBehavior.from(safeView).apply {
                state = BottomSheetBehavior.STATE_EXPANDED
                setBottomSheetCallback(object : BottomSheetBehavior.BottomSheetCallback() {
                    override fun onStateChanged(p0: View, p1: Int) {
                        if (p1 == BottomSheetBehavior.STATE_DRAGGING) {
                            state = BottomSheetBehavior.STATE_EXPANDED
                        }
                    }

                    override fun onSlide(p0: View, p1: Float) {}
                })
            }
        }
    }

    override fun onCreateView(
        inflater: LayoutInflater,
        container: ViewGroup?,
        savedInstanceState: Bundle?
    ): View? = inflater.inflate(
        R.layout.dialog_home, container, false
    )

    override fun onViewCreated(view: View, savedInstanceState: Bundle?) {
        super.onViewCreated(view, savedInstanceState)
        btnAccept = view.findViewById(R.id.btnAccept)
        btnReject = view.findViewById(R.id.btnReject)
        setListeners()
    }

    private fun setListeners() {
        btnAccept?.setOnClickListener { setResult(true) }
        btnReject?.setOnClickListener { setResult(false) }
    }

    private fun setResult(isAccept: Boolean) {
        parentFragmentManager.setFragmentResult(REQUEST_KEY, bundleOf("data" to isAccept))
        findNavController().popBackStack()
    }

    override fun onCancel(dialog: DialogInterface) {
        super.onCancel(dialog)
        setResult(false)
    }
}
In the setFragmentResult in the dialog, I send the result returned from the dialog.
Utilized Resources and Result
You can access the application described in the article from the link.
As seen in our examples, FragmentResult provides us with a very good alternative in communication between fragments with its simple use.
I hope it was useful, and see you in the next articles. 🖐🏼
16 Oct 2020
This post is to The Turkish of this article is also available in Medium.
What is Jetpack Datastore? Why should we use Jetpack Datastore?
Hello everyone,
In this article, I’ll talk about the DataStore structure, which is one of the Android Jetpack components. I’ll explain in code by giving examples with DataStore Preferences.
So what is a DataStore, why should we use it? Let’s start by giving information about!
What is Datastore?
DataStore is a Jetpack component that is used to store our local data as an asecron with Kotlin Coroutine and Flow structures instead of SharedPreferences.
So why should we use this structure when there is SharedPreferences? Let’s explain by comparing the two structures.
SharedPreferences vs DataStore
- DataStore and SharedPreferences both use the Async API. Datastore uses it for both writing and reading, while SharedPreferences only uses it to listen when changing variables.
- DataStore is safe to run under UI thread. Working with UI thread prevents ANR from occurring.
- DataStore is support error handling.
- DataStore is support kotlin kotlin-corutine and flow stuctures.
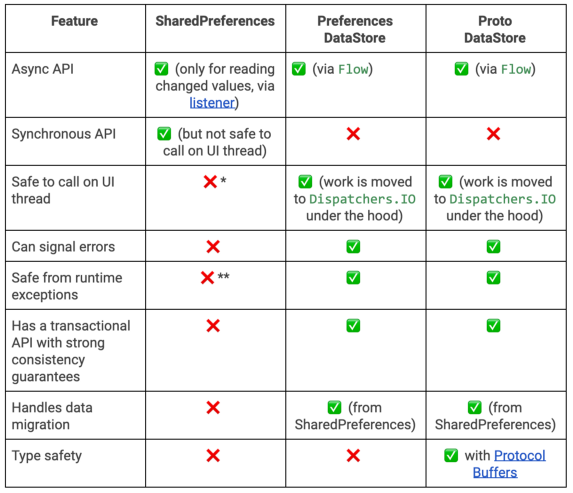
If we look at the this in more detail, there are two different type of structure. These;
- Preferences Datastore, this type stores data in key/value pairs like SharedPreferences but doesn’t provde any type of security.
- Proto Datastore this type stores data as objects,
We can provide storage using both types. But Proto provides type security. You also define a schema when using Proto.
You must define this schema under index src/main/proto/directory. This diagram contains the types of objects you’ll use.
More detailed information can be found at.
Let’s look at its setup and usage now.
….
Datastore Preferences Setup and Usage
  dependencies {
    // Preferences DataStore
    implementation "androidx.datastore:datastore-preferences:1.0.0-alpha02"

    // Proto DataStore
    implementation "androidx.datastore:datastore-core:1.0.0-alpha02"
}
We’ve added our Datastore libraries to project by including our dependencies in build.gradle.
Firstly we created class in the Datastore Preferences structure and created the data writing and reading fuctions that we’ll use.
class BasePreferences(private val context: Context) {

    companion object{
        val BASE_KEY = preferencesKey<String>(name = "key")
    }

    private val dataStore: DataStore<Preferences> = context.createDataStore(
        name = "pref"
    )

    suspend fun saveValue(value: String){
        dataStore.edit { preferences ->
            preferences[BASE_KEY] = value
        }
    }

    val lastSavedValue: Flow<String> = dataStore.data
        .map { preferences ->
            preferences[BASE_KEY] ?: "default value"
        }
}
Let’s simply show how we can write and use these values using to viewmodelScope in the viewModel.
  class BaseViewModel(
    private val app: Application,
    //repository
  ) : ViewModel{

      var basePreferences = BasePreferences(app.applicationContext)
      var dataStoreLiveData: LiveData<String> = MutableLiveData()
      var baseValue :String = ""

      // we can write to value with the method.
      fun saveValue(val v : String){
        viewModelScope.launch {
            basePreferences.saveValue(v)
        }
      }

      // The method we created to observe the data.
     // We can listen to our value in the activity or fragment class where we will use our view model.
    fun getLiveData(){
        viewModelScope.launch{
          dataStoreLiveData = basePreferences.lastSavedValue()
                      .asLiveData(viewModelScope.coroutineContext+Dispatchers.Default)
        }
    }

    // we can read to value with the function.
    fun getValue(){
        basePreferences.lastSavedValue()
            .collect { value ->
                baseValue = value
        }
    }

  }
As I wrote in the commentline, we can listen to our livedata type variable in our activity or fragment class, where we’ll use our viewmodel and the necessary actions according to the charge.
Or we can collect and read data directly.
Utilized Resources and Result
As seen in our examples, it is advantageous to use the DataStore Coroutine and Flow structure. It is a more reliable, more useful solution than SharedPreferences to securely perform asecron processing in UI threats.
See you in the next articles.
15 Jul 2020
What is this Okhttp Interceptor?
Basically, Interceptors are like security guards at the airport. They decide our passage and stop.
It has two different tasks. These;
- It’s used to log for a network call using the interceptor.
- It’s used to cache network calls.
There are two different interceptors.
- Application Interceptors are added between these interceptors Application code and OkHttp Core Library. We use it with
addInterceptor().
- Network Interceptor, these interceptors are added between OkHttp Core Library and Server. We can add them to OkHttpClient using
addNetworkInterceptor().
How to add Interceptor in OkHttp?
These add to Interceptor in OkHttp.
    fun myHttpClient(): OkHttpClient {
        val builder = OkHttpClient().newBuilder()
            .addInterceptor(/*our interceptor*/)
        return builder.build()
    }
If we create to own interceptor, like code this bellow done.
class ErrorInterceptor : Interceptor {
    override fun intercept(chain: Interceptor.Chain): Response {

        val request: Request = chain.request()
        val response = chain.proceed(request)
        when (response.code()) {
            400 -> {
                //Show Bad Request Error Message
            }
            401 -> {
                //Show UnauthorizedError Message
            }

            403 -> {
                //Show Forbidden Message
            }

            404 -> {
                //Show NotFound Message
            }

            // ... and so on

        }
        return response
    }
}
As understood in the code, we make the necessary logging according to the returned response.
This article hopefully help to your. See you in the next articles.